Our YouTube channel includes detailed installation guides, frequently asked questions, product overviews and lots more. We are always open to content ideas so please let us know if there is a topic you would like us to cover.
The Importance of Proper Shade Sail Tensioning
It’s mid-summer and the sun is beating down—your outdoor space feels too hot to enjoy. One of the easiest ways to cool things down is by adding tensioned shade sails. They’re a simple, effective way to bring shade and comfort to your yard or patio. But for them to work well and last, proper tensioning is key. In this article, we’ll explain the importance of proper shade sail tensioning and how getting it right can make a big difference in performance and durability.
Tension Shade Sails
Tension shade sails, as their name suggests, work primarily on the principle of tension. Proper tensioning ensures that your shade sails maintain their shape, provide optimal shade, and stand up to the elements, including the harsh Summer sun. But how do you ensure that your tension shade sails are properly tensioned?
Getting the Tension Right: Step-by-Step Guide
Proper tension is key to both the performance and durability of your shade sail. Follow this step-by-step process to ensure your sail is secure, tight, and built to last.
✅ Step 1: Set the Right Angle
-
Position each corner of the sail so that angles are at least 20 degrees apart.
-
This allows for proper force distribution and helps avoid sagging.
💡 Tip: Use a level or angle finder to help you measure and position corners accurately.
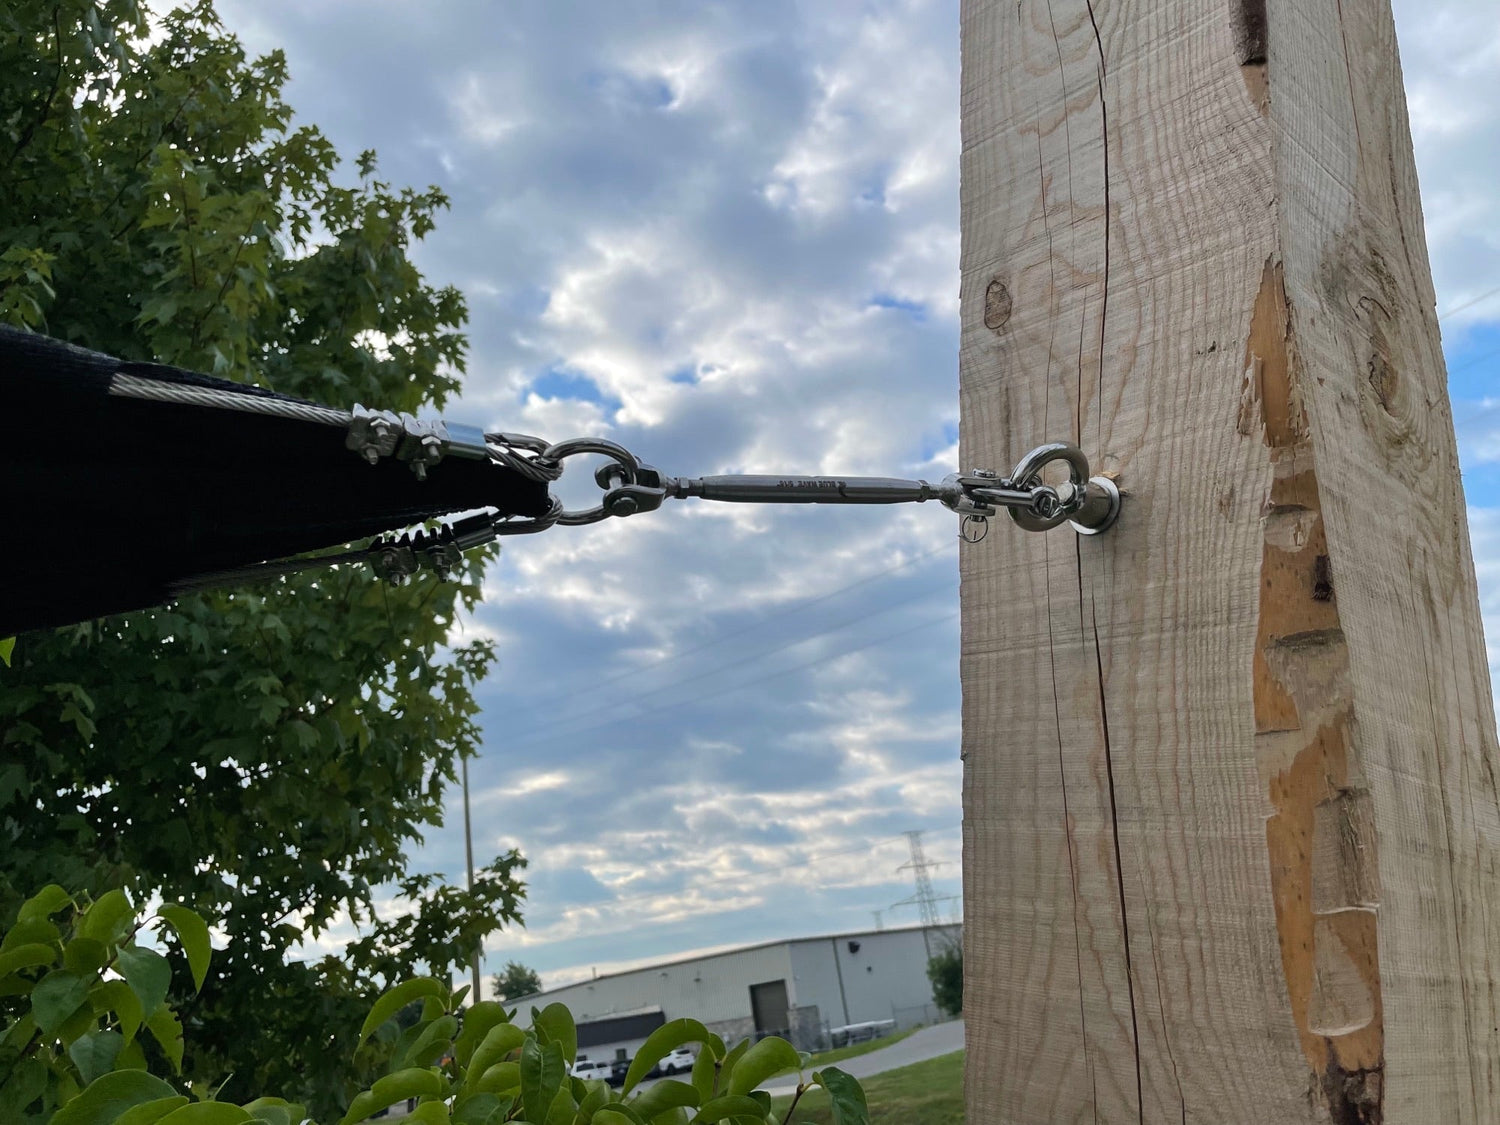
✅ Step 2: Choose Strong Mounting Points
-
Use secure, load-bearing structures such as galvanized steel poles, concrete walls, or reinforced wooden posts.
-
Ensure each point can handle the constant tension and occasional wind loads—especially in hot, gusty climates.
⚠️ Avoid mounting to fences or weak architectural features, as they may warp or fail over time.
✅ Step 3: Apply Even Tension
-
Use turnbuckles or tensioning devices to tighten each corner evenly and gradually.
-
The sail should feel firm to the touch, with minimal give.
Regular Checks & Adjustments: Maintenance Checklist
Even a perfectly installed sail can shift over time due to weather or material stretch. Use this quick checklist to keep your shade sail in top condition:
-
🔄 Inspect tension monthly—especially after storms or heat waves
-
📏 Look for sagging or loose areas that may flap in the wind
-
🪢 Check mounting hardware for signs of rust, loosening, or wear
-
🔧 Retighten and adjust as needed to maintain even stress across all corners

Professional Installation vs. DIY
Getting the right tension for your shade sail is part science, part art. While hiring a professional tension shade sails specialist can guarantee proper installation, our sails our designed to be DIY friendly.
Following our instruction booklets, watching our YouTube videos and contacting on of our friend staff will guarantee that your DIY installation will be done correctly and safely. Our experts have the knowledge and tools to provide guidance for the perfect installation, maximizing the benefits of your tension shade sails.
Frequently Asked Questions: Tension Shade Sails
Why is proper tensioning important for shade sails?
Proper tensioning helps your shade sail stay tight, secure, and looking great. It prevents flapping in the wind, reduces fabric wear, and keeps the sail in place during bad weather. It also helps rainwater run off instead of pooling and improves the overall appearance of your outdoor space.

How do I make sure my shade sail is tensioned correctly?
Start by checking that your mounting points (like poles or wall anchors) are strong and stable. Use turnbuckles or a pulley system to tighten the sail so it’s firm with no sagging.
Here’s a simple checklist to follow:
-
Secure all corners to strong, stable anchor points
-
Lightly tighten the sail at first
-
Gradually apply even tension using turnbuckles or pulleys
-
Watch for creases—light ones may smooth out over time
-
Check and adjust tension during the first few weeks
What happens if a shade sail isn’t secured properly?
If the sail isn’t tight enough, it can sag or flap in the wind. This can cause the fabric to stretch, tear, or wear out faster. Water can also collect in low spots, adding extra weight and pulling on the anchors, which might lead to damage. In strong winds, a loose sail could even come off, which can be dangerous.
Are there specific techniques for tensioning shade sails properly?
Yes. Tensioning your sail correctly makes a big difference in how it performs. Try this simple technique:
-
Lightly attach all corners to anchor points
-
Set your cable clamps (if you're using them)
-
Use a turnbuckle or pulley system to apply even tension
-
Tighten one corner, then move to the opposite one for balance
-
Repeat until the sail is firm and smooth
You can also follow along with our full installation guide or watch a tutorial on our YouTube channel.
Conclusion
Tensioned shade sails are a smart, stylish solution for creating comfortable outdoor spaces—but their effectiveness depends on how well they're installed. As we've covered, the importance of proper shade sail tensioning can’t be overstated. It not only improves durability and weather resistance but also enhances the overall look and feel of your setup.
By following the right techniques, checking your hardware, and applying even tension, you’ll ensure your shade sail performs at its best for years to come. Whether you're installing it yourself or working with a professional, getting the tension right is key to long-term success.